Documentation Index
Fetch the complete documentation index at: https://docs.zencoder.ai/llms.txt
Use this file to discover all available pages before exploring further.
Overview
Every Zenflow repository starts by picking a task type. When a repository is empty you see four full-width cards—Quick Change, Fix Bug, Spec and Build, and Full SDD Workflow—each describing how the next task will run. Selecting a card launches the task creation modal and seeds the right workflow for the Task column.Quick Change
Fastest path for small, well-understood tasks. The agent makes light assumptions and executes without back-and-forth.
Fix Bug
Triage regressions quickly with investigation, solution design, and implementation guardrails.
Spec and Build
Leads with a technical spec before coding. Great when you want the plan vetted before implementation.
Full Specification-Driven Development (SDD) Workflow
Comprehensive spec-driven development for larger efforts. Generates PRDs, technical specs, and implementation plans with AI code review.
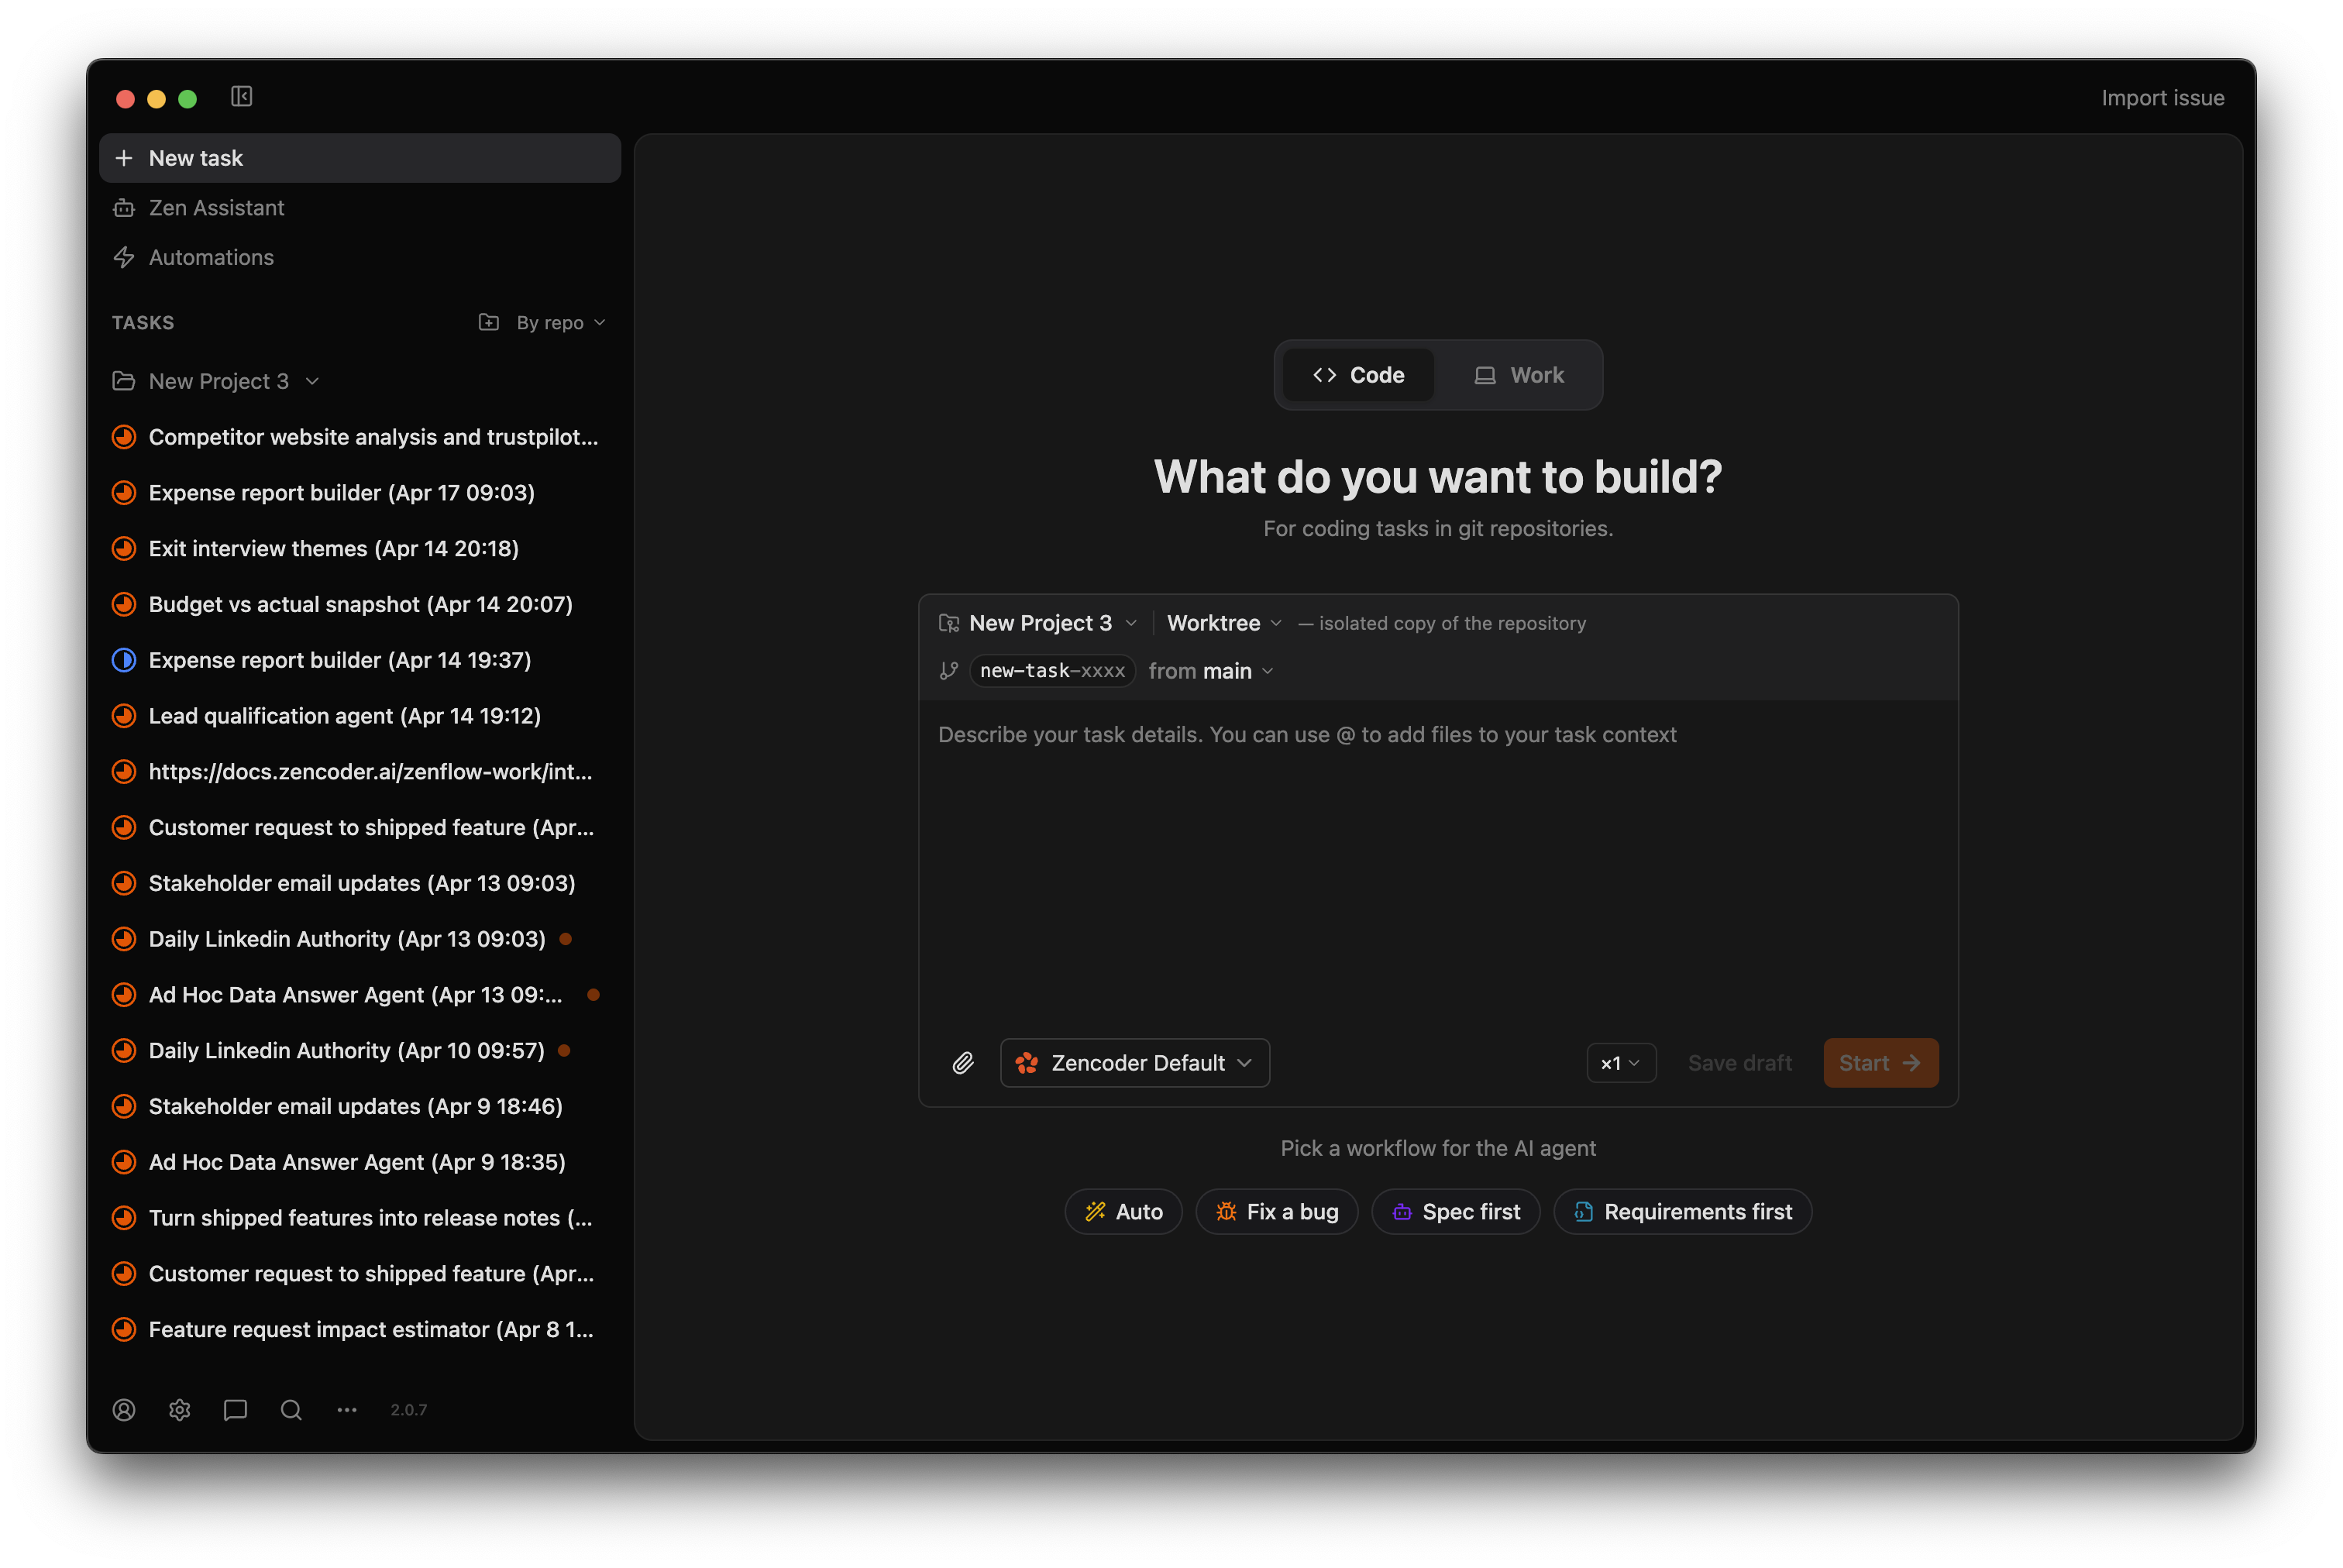
Creating a Task
The modal follows the same steps regardless of type:Describe the task
Provide a title and rich description. Use the
@ button to reference files or attach screenshots so the assignee has full context.Pick the workspace
Each task spins up an isolated copy of the repo. Choose the source branch so parallel tasks never collide.
Tune automation
Expand Advanced to select an agent (Claude Code, Codex, Copilot, Gemini, Qwen Code) plus a saved configuration such as
APPROVALS, DEFAULT, or PLAN. Presets (under Settings → Saved presets) define prompt overrides, model choices, sandbox policies, and permission levels.Confirm the type
You can still switch between Quick Change, Fix Bug, Spec and Build, or the Full SDD Workflow. The UI stays identical, but the downstream workflow adapts accordingly.
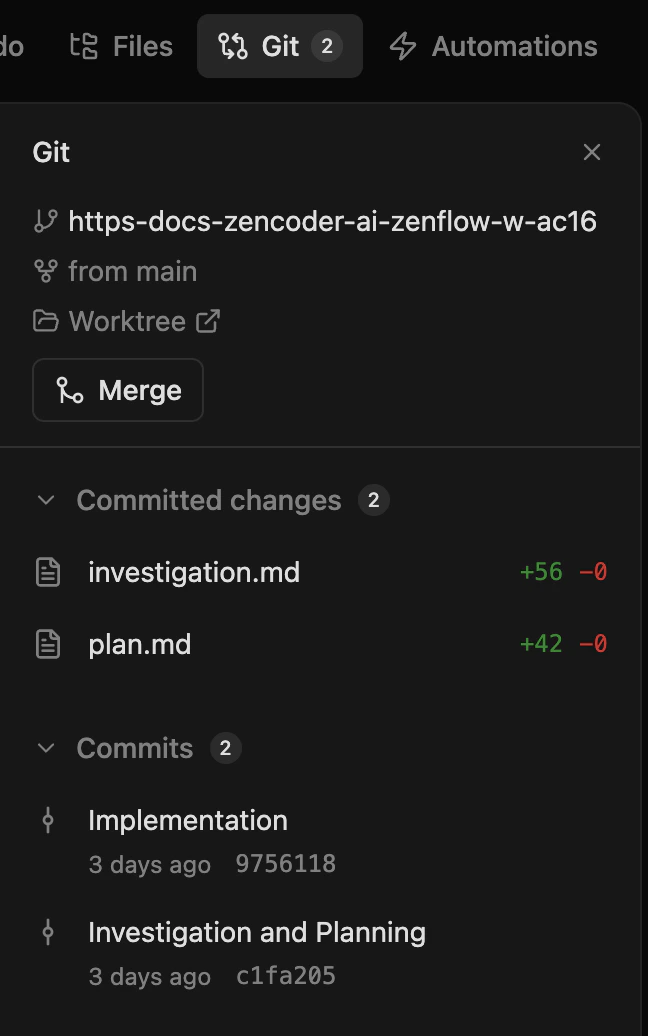
Understanding Git Worktrees in Zenflow
Every task in Zenflow runs in its own isolated workspace powered by Git worktrees. This is what enables true parallel execution—multiple agents working simultaneously without stepping on each other’s changes.The Basics
Git worktrees allow you to check out multiple branches from the same repository at once, each in its own directory. Instead of switching branches and stashing changes, you work in separate directories that all share the same Git history. When you create a task in Zenflow:- A new worktree is created at
.zenflow/tasks/{task_id} - A dedicated branch is created for that task
- Agents work in this isolated directory without affecting your main workspace
- Changes remain completely separate until you merge
.zenflow/tasks/, each checked out to its own branch, all sharing the same Git history.
Working with the IDE
Keep the agent and your editor aligned by following these patterns.Launch the right workspace
- Repository ⋯ → Open in IDE opens your usual repo checkout.
- Task ⋯ → Open in IDE opens that task’s .zenflow/tasks/ worktree so you see exactly what the agent edits.
Commit manual IDE edits
Zenflow auto-commits each agent step. When you make manual changes in the IDE, they surface as uncommitted in Zenflow—go to the Changes page to Commit them into the workflow or Discard if you want to roll back.
Best Practices
Keep worktrees task-scoped
Each task should have exactly one worktree. Don’t manually create additional worktrees inside
.zenflow/tasks/ or you’ll confuse Zenflow’s orchestration.Let Zenflow manage worktree lifecycle
Zenflow automatically creates worktrees when tasks start and cleans them up when tasks are archived or deleted. Manual worktree commands (
git worktree add/remove) inside Zenflow directories can break this automation.Merge or archive completed tasks promptly
Worktrees consume disk space. After merging a task’s changes, archive or delete the task so Zenflow can clean up the worktree directory.
Use the source branch selector carefully
When creating a task, the “workspace” dropdown lets you choose which branch to base your work on. This determines what code your task starts with—usually
main or develop, but could be another feature branch if you’re building on unmerged work.Common Issues
Troubleshooting worktree issues
If a task workspace becomes corrupted or won’t open:
- Try archiving and recreating the task
- Check that you have sufficient disk space
- Verify the source branch still exists in your repository
- Look for error messages in the task’s chat telemetry
Task Type Reference
Each type seeds.zenflow/tasks/{task_id} with artifacts and determines what appears in the middle column. Use the summaries below to pick the right fit.
Quick Change
When to use
Small, clearly scoped tasks or quick experiments where the requirements are obvious.
Artifacts & workflow
plan.mdfocuses on a single execution step so work can start immediately.- No additional docs are created by default—the agent moves straight into implementation.
- You can add steps manually if the task grows beyond the initial scope.
Fix Bug
When to use
Regressions, failing checks, or any work focused on restoring existing behavior.
Workflow checkpoints
- Investigate the issue and capture the root cause.
- Design a targeted solution that covers edge cases.
- Implement the fix and verify with tests before shipping.
Artifacts & workflow
plan.mdlists Investigation, Solution Design, and Implementation so you can see progress at a glance.investigation.mddocuments summary, root cause, and impact.solution.mdoutlines the proposed fix, files, tests, and risks.implementation.mdrecords the actual patch and verification steps.
Spec and Build
When to use
Medium-sized features and improvements where you want to review the technical approach before code lands.
Workflow checkpoints
- Create the technical specification.
- Plan implementation steps based on the spec.
- Build step by step with optional human review in between.
Artifacts & workflow
plan.mdoutlines Specification → Implementation Plan → Implementation.spec.mdcaptures architecture, contracts, and verification strategy.- Implementation updates
plan.mdwith executable steps and deliverables.
Full SDD Workflow
When to use
Larger initiatives that need product requirements, specs, and staged implementation with AI auto-review.
Workflow checkpoints
- Gather requirements and create the PRD.
- Prepare the detailed technical specification.
- Break the work into ordered implementation steps.
- Implement with AI code review guarding each stage.
Artifacts & workflow
requirements.mdevolves into the PRD for stakeholder alignment.spec.mddetails architecture, dependencies, and verification.plan.mdhosts the multi-step implementation plan with checkboxes.- AI verifier steps keep diffs reviewed continuously during implementation.
Custom Workflows
Custom workflows let you design additional task templates beyond the four built-ins. Add a Markdown file describing the workflow steps to.zenflow/workflows/ in your repo root and Zenflow will surface it alongside the default options when creating a task.
Common Structure
Typical workflow files share these traits:- Title and configuration: Start with an
#-level heading plus a Configuration section that sets shared context—typically anArtifacts Pathpointing to{@artifacts_path}(.zenflow/tasks/{task_id}). - Workflow steps: Each step is written as
### [ ] Step: {Name}so it slots into the Steps column with unchecked boxes. - Detailed instructions: Under each step, describe objectives, acceptance criteria, and links to artifacts. The spec-focused steps output
spec.md, optional planning usesplan.md, implementation steps createreport.md, and review steps modify the prior artifact. - Optional reviews: You can insert extra stages such as “Specification Review” between the spec and implementation to enforce approvals or QA.
- Agent per step: Any agent presets you define in your Zenflow settings can be applied to any specific step using the format below.
Authoring Tips
- Scope steps so each represents a coherent milestone (e.g., “Technical Specification,” “Implementation,” “Review”).
- Reference artifact placeholders (
{@artifacts_path}/spec.md) so Zenflow resolves per-task paths automatically. - Use enumerated lists for actions and highlight decision criteria (approve vs. change requested) if the workflow requires loops.
- Keep wording imperative so agents understand expected deliverables and verification requirements.