> ## Documentation Index
> Fetch the complete documentation index at: https://docs.zencoder.ai/llms.txt
> Use this file to discover all available pages before exploring further.
# Uninstalling Integrations
> Learn how to disconnect integrations and remove the Zenflow application from your workspace or third-party marketplaces.
If you no longer need an integration or want to revoke access for security or compliance reasons, you can easily disconnect it directly from Zenflow or remove the application from the provider's marketplace.
## Disconnecting an Integration in Zenflow
To temporarily or permanently disconnect an active integration within Zenflow, follow these steps:
Go to **Connections** (or click the Settings gear icon and select **Connections**) in the left sidebar of Zenflow.
Find the active integration you wish to remove under its corresponding category (such as Development, Messaging, or Infrastructure).
Next to the connection status (e.g., *Connected as Username*), click the **Disconnect** button.
 Once clicked, the integration is immediately disconnected. Zenflow agents will no longer have access to read, write, or act on data inside that external tool.
## Removing Zenflow from Third-Party Marketplaces
For full compliance and complete removal, you can also uninstall Zenflow directly from your third-party provider's marketplace or application directory.
Below is an example of revoking access for GitHub, which is an OAuth-based integration:
### GitHub (OAuth App Example)
1. Go to your GitHub **Settings**.
2. In the left sidebar, navigate to **Integrations** > **Applications** > **Authorized OAuth Apps**.
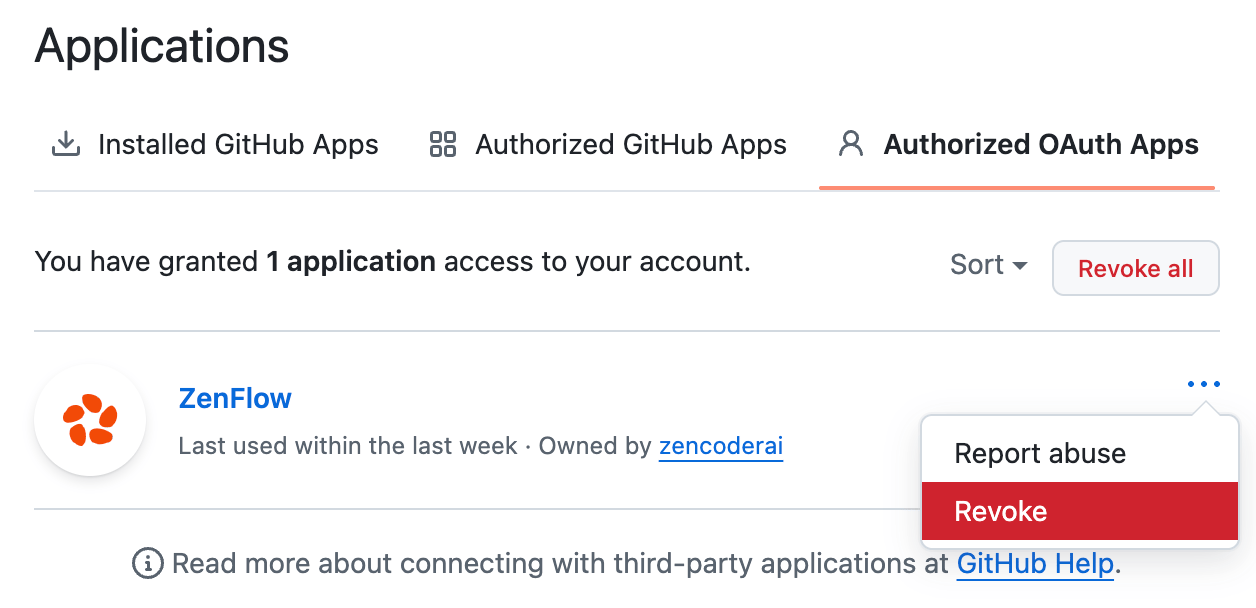
3. Locate **ZenFlow** (or **Zencoder**).
4. Click the **...** (three dots) icon next to it and select **Revoke**.
Once clicked, the integration is immediately disconnected. Zenflow agents will no longer have access to read, write, or act on data inside that external tool.
## Removing Zenflow from Third-Party Marketplaces
For full compliance and complete removal, you can also uninstall Zenflow directly from your third-party provider's marketplace or application directory.
Below is an example of revoking access for GitHub, which is an OAuth-based integration:
### GitHub (OAuth App Example)
1. Go to your GitHub **Settings**.
2. In the left sidebar, navigate to **Integrations** > **Applications** > **Authorized OAuth Apps**.
3. Locate **ZenFlow** (or **Zencoder**).
4. Click the **...** (three dots) icon next to it and select **Revoke**.
 ## Revoking Manually Created API Keys & Personal Access Tokens
Some integrations connect via manually generated **API Keys** or **Personal Access Tokens (PATs)** rather than standard OAuth marketplace apps. For these token-based integrations, you must revoke or delete the token directly within the provider's account settings to completely remove access.
Below is an example of revoking access for Vercel, which is a token-based integration:
### Vercel (Personal Access Tokens Example)
1. Open Vercel and click your user profile avatar in the top right to open the user menu.
2. Select the **Settings** gear icon next to your profile name.
3. In the left navigation menu under your account settings, click **Tokens**.
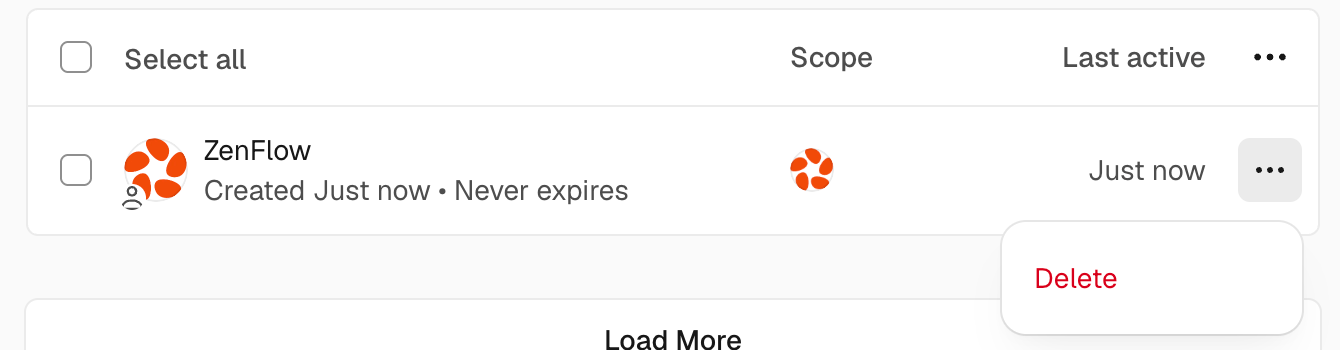
4. Locate the token created for Zenflow/Zencoder (e.g., named **Zenflow** or **Zencoder**).
5. Click the **...** (three dots) icon next to the token, select **Delete**, and confirm the deletion.
## Revoking Manually Created API Keys & Personal Access Tokens
Some integrations connect via manually generated **API Keys** or **Personal Access Tokens (PATs)** rather than standard OAuth marketplace apps. For these token-based integrations, you must revoke or delete the token directly within the provider's account settings to completely remove access.
Below is an example of revoking access for Vercel, which is a token-based integration:
### Vercel (Personal Access Tokens Example)
1. Open Vercel and click your user profile avatar in the top right to open the user menu.
2. Select the **Settings** gear icon next to your profile name.
3. In the left navigation menu under your account settings, click **Tokens**.
4. Locate the token created for Zenflow/Zencoder (e.g., named **Zenflow** or **Zencoder**).
5. Click the **...** (three dots) icon next to the token, select **Delete**, and confirm the deletion.
 ***
Disconnecting or uninstalling an integration will stop all automated tasks and workflows that rely on that specific tool. You can reconnect the integration at any time by following the standard installation guide.
***
Disconnecting or uninstalling an integration will stop all automated tasks and workflows that rely on that specific tool. You can reconnect the integration at any time by following the standard installation guide.